prometheus 简介
Prometheus(普罗米修斯)是一套开源的集监控、报警、时间序列数据库一体的组合系统,它的基本原理是通过 HTTP 协议周期性抓取被监控组件的状态,这样做的好处是任意组件只要提供 HTTP 接口就可以接入监控系统,不需要任何 SDK 或者其他的集成过程。这样做非常适合虚拟化环境,如 VMware 或者 Docker ,并且 Prometheus 监控系统是为数不多的适合 Docker、Mesos、Kuber***es 环境的监控系统之一。
Prometheus 特点
易于管理:
Prometheus 的核心部分只有一个单独的二进制文件,不存在任何的第三方依赖(数据库,缓存等),
唯一需要的就是本地磁盘,因此不会有潜在级联故障的风险。
强大的查询语言 PromQL:
Prometheus 内置一个强大的数据查询语言 PromQL,通过 PromQL 可以实现对监控数据的查询、聚合,同时 PromQL 也被应用于数据可视化(如 grafana)以及告警中。
高效:
对于监控系统而言,大量的监控任务必然导致有大量的数据产生,而 Prometheus 可以高效的处理这些数据。
可扩展:
Prometheus 支持联邦集群,可以让多个 Prometheus 实例产生一个逻辑集群;当单实例 Prometheus 处理的任务量过大时,通过使用功能分区(sharding)+ 联邦集群(federation)可以对其进行扩展。
易于集成:
目前官网提供了多种语言的客户端 SDK,基于这些 SDK 可以快速让应用程序纳入到监控系统中,同时还支持与其它的监控系统集成。
可视化:
Prometheus Server 自带一个 UI,通过这个 UI 可以方便对数据进行查询和图形化展示;同时还可以对接 Grafana 可视化工具展示精美监控指标。
Prometheus 基础架构
如上图,Prometheus 主要由以下部分组成:
- Prometheus:主要是负责存储、抓取、聚合、查询方面。
- Alertemanager:主要是负责实现报警功能。
- Pushgateway:主要是实现接收有 Client-push 过来的指标数据,在指定的时间间隔,有主程序来抓取。
- *_exporter:主要是负责采集物理机、中间件的信息。
Prometheus 安装
1.安装ntpdate工具,进行时间同步,关闭防火墙
[root@22 ~]# yum -y install ntpdate

[root@22 ~]# /usr/sbin/ntpdate ntp1.aliyun.***    #同步阿里云时间

[root@22 prometheus]# systemctl stop firewalld
2.下载 prometheus 并解压部署
[root@22 ~]# mkdir prometheus

[root@22 ~]# wget https://github.***/prometheus/prometheus/releases/download/v2.16.0/prometheus-2.16.0.linux-amd64.tar.gz

[root@22 prometheus]# tar -xf prometheus-2.47.2.linux-amd64.tar.gz

[root@22 prometheus]# mv prometheus-2.47.2.linux-amd64 /usr/local/prometheus

[root@22 prometheus]# ll /usr/local/prometheus
总用量 236840
drwxr-xr-x 2 mysql 127        38 10月 13 00:41 console_libraries
drwxr-xr-x 2 mysql 127       173 10月 13 00:41 consoles
-rw-r--r-- 1 mysql 127     11357 10月 13 00:41 LICENSE
-rw-r--r-- 1 mysql 127      3773 10月 13 00:41 NOTICE
-rwxr-xr-x 1 mysql 127 124149297 10月 13 00:11 prometheus
-rw-r--r-- 1 mysql 127       934 10月 13 00:41 prometheus.yml
-rwxr-xr-x 1 mysql 127 118350184 10月 13 00:14 promtool
3.创建 prometheus 用户并授权
[root@22 prometheus]# useradd -s /sbin/nologin prometheus

[root@22 prometheus]# chown -R prometheus:prometheus /usr/local/prometheus/

[root@22 prometheus]# ll /usr/local/prometheus/
总用量 236840
drwxr-xr-x 2 prometheus prometheus        38 10月 13 00:41 console_libraries
drwxr-xr-x 2 prometheus prometheus       173 10月 13 00:41 consoles
-rw-r--r-- 1 prometheus prometheus     11357 10月 13 00:41 LICENSE
-rw-r--r-- 1 prometheus prometheus      3773 10月 13 00:41 NOTICE
-rwxr-xr-x 1 prometheus prometheus 124149297 10月 13 00:11 prometheus
-rw-r--r-- 1 prometheus prometheus       934 10月 13 00:41 prometheus.yml
-rwxr-xr-x 1 prometheus prometheus 118350184 10月 13 00:14 promtool
4.配置 prometheus.service 文件,没有就创建
[root@22 prometheus]# vi /usr/lib/systemd/system/prometheus.service
[Unit]
Description=prometheus
After=***work.target

[Service]
User=prometheus
Group=prometheus
WorkingDirectory=/usr/local/prometheus
ExecStart=/usr/local/prometheus/prometheus
[Install]
WantedBy=multi-user.target
5.配置prometheus服务自启动
[root@22 prometheus]# systemctl daemon-reload

[root@22 prometheus]# systemctl enable --now prometheus
Created symlink from /etc/systemd/system/multi-user.target.wants/prometheus.service to /usr/lib/systemd/system/prometheus.service.

[root@22 prometheus]# ss -antulp |grep :9090
tcp    LISTEN     0      128      :::9090                 :::*                   users:(("prometheus",pid=6657,fd=7))
6.启动 Prometheus 服务后,通过 9090 端口来访问 Prometheus 自带的 UI 界面:
后端存储部署
默认情况下 Prometheus 会将采集的数据存储到本机的 /usr/local/prometheus/data 目录,存储数据的大小受限和扩展不便;所以这里使用 influxdb 作为后端的数据库来存储数据。
1.下载安装influxdb
[root@22 ~]# wget https://dl.influxdata.***/influxdb/releases/influxdb-1.7.8.x86_64.rpm

[root@22 prometheus]# ll
-rw-r--r-- 1 root root 51010897 10月 19 17:11 influxdb-1.7.8.x86_64.rpm
-rw-r--r-- 1 root root 95708924 10月 19 17:11 prometheus-2.47.2.linux-amd64.tar.gz

[root@22 prometheus]# yum -y localinstall influxdb-1.7.8.x86_64.rpm

[root@22 prometheus]# cp /etc/influxdb/influxdb.conf /etc/influxdb/influxdb.conf.default

[root@22 prometheus]# systemctl enable --now influxdb
2.配置influxdb数据库,创建prometheus库,用于存储监控数据
[root@22 prometheus]# influx
Connected to http://localhost:8086 version 1.7.8
InfluxDB shell version: 1.7.8
> create database prometheus;    #创建 Prometheus 数据库
> show databases;
name: databases
name
----
_internal
prometheus
> exit
3.配置 Prometheus 集成 infuxdb数据库
[root@22 prometheus]# vi /usr/local/prometheus/prometheus.yml     #在结尾处添加配置
...
...
remote_write:
  - url: "http://localhost:8086/api/v1/prom/write?db=prometheus"
remote_read:
  - url: "http://localhost:8086/api/v1/prom/read?db=prometheus"
注意:如果你的 influxdb 配置了密码,参考官方配置模板
influxdb官网:https://docs.influxdata.***/influxdb/v1/supported_protocols/prometheus/
remote_write:
  - url: "http://localhost:8086/api/v1/prom/write?db=prometheus&u=username&p=password"

remote_read:
  - url: "http://localhost:8086/api/v1/prom/read?db=prometheus&u=username&p=password"
使用 Prometheus 实现系统监控
因为 Prometheus 并不能直接监控服务,其主要任务负责数据的收集,存储并对外提供数据查询支持;因此,为了能够监控到某些东西,如:主机的 CPU 使用率,我们需要使用到 Exporter。
1.下载安装 node-exporter
[root@22 prometheus]# get https://github.***/prometheus/node_exporter/releases/download/v0.18.1/node_exporter-0.18.1.linux-amd64.tar.gz

[root@22 prometheus]# tar -xf node_exporter-0.18.1.linux-amd64.tar.gz

[root@22 prometheus]# mv node_exporter-0.18.1.linux-amd64 /usr/local/exporter

[root@22 prometheus]# ll /usr/local/exporter
总用量 16500
-rw-r--r-- 1 3434 3434    11357 6月   5 2019 LICENSE
-rwxr-xr-x 1 3434 3434 16878582 6月   5 2019 node_exporter
-rw-r--r-- 1 3434 3434      463 6月   5 2019 NOTICE
2.创建 node_exporter 服务自启动管理文件
[root@22 prometheus]# vi /usr/lib/systemd/system/node_exporter.service
[Unit]
Description=node_exporter
After=***work.target

[Service]
User=prometheus
Group=prometheus
ExecStart=/usr/local/exporter/node_exporter \
          --web.listen-address=:20001 \
          --collector.systemd \
          --collector.systemd.unit-whitelist=(sshd|nginx).service \
          --collector.processes
[Install]
WantedBy=multi-user.target

[root@22 prometheus]# systemctl daemon-reload

[root@22 prometheus]# systemctl enable --now node_exporter

[root@22 prometheus]# ss -antulp |grep :20001
tcp    LISTEN     0      128      :::20001                :::*                   users:(("node_exporter",pid=15672,fd=3))

[root@22 prometheus]# ps -aux | grep -v grep | grep node_exporter
prometh+  15672  0.0  0.4 113420  4976 ?        Ssl  10月19   0:00 /usr/local/exporter/node_exporter --web.listen-address=:20001 --collector.systemd --collector.systemd.unit-whitelist=(sshd|nginx).service --collector.processes
3.启动 node_exporter 服务后,通过 20001 端口来访问 Client 的监控指标。
4.修改 Promehteus 配置文件,添加主机配置
[root@22 prometheus]# vi /usr/local/prometheus/prometheus.yml
...
scrape_configs:
  # The job name is added as a label `job=<job_name>` to any timeseries scraped from this config.
  - job_name: "prometheus"

    # metrics_path defaults to '/metrics'
    # scheme defaults to 'http'.

    static_configs:           #相关配置
      - targets: ["localhost:9090"]
  - job_name: "Client"
    static_configs:
      - targets:
        - "192.168.101.22:20001"

remote_write:
  - url: "http://localhost:8086/api/v1/prom/write?db=prometheus"
remote_read:
  - url: "http://localhost:8086/api/v1/prom/read?db=prometheus"

[root@22 prometheus]# systemctl restart prometheus
5.访问 prometheus,查看 client 主机的监控数据
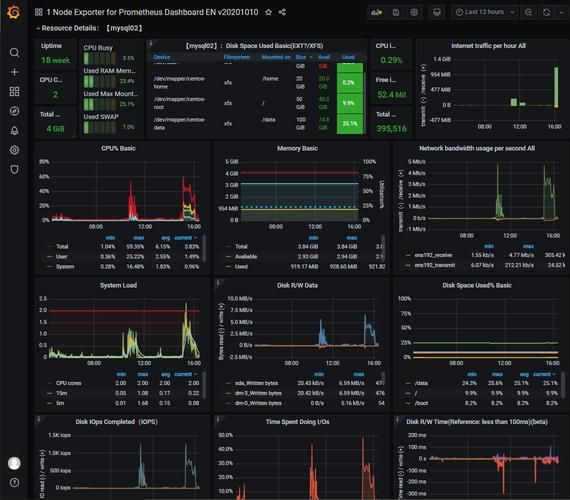
使用 Prometheus + Grafana 实现可视化界面
在 Prometheus 中,我们可以使用 Web 界面进行数据的查询和展示,但是展示效果不是很好;
所以我们这里使用 Grafana 来配合 Prometheus 使用。
1.下载安装grafana
[root@22 prometheus]# get https://dl.grafana.***/oss/release/grafana-6.1.4-1.x86_64.rpm

[root@22 prometheus]# yum -y localinstall grafana-6.1.4-1.x86_64.rpm

[root@22 prometheus]# systemctl enable --now grafana-server

[root@22 prometheus]# ss -antulp |grep :3000
tcp    LISTEN     0      128      :::3000                 :::*                   users:(("grafana-server",pid=20775,fd=6))

[root@22 prometheus]# ps -aux |grep -v grep |grep grafana
grafana   20775  0.7  2.6 533052 26064 ?        Ssl  01:10   0:00 /usr/sbin/grafana-server --config=/etc/grafana/grafana.ini --pidfile=/var/run/grafana/grafana-server.pid --packaging=rpm cfg:default.paths.logs=/var/log/grafana cfg:default.paths.data=/var/lib/grafana cfg:default.paths.plugins=/var/lib/grafana/plugins cfg:default.paths.provisioning=/etc/grafana/provisioning
2.配置 Grafana 的 Web 界面
默认的初始账号密码都是admin
3.提示Add data source(添加数据源)
4.导入自带的模板和常用模板–》12884
-》1.监控物理机/虚拟机ID(Linux)
8919
9276
1860
-》2.监控物理机/虚拟机ID(Windows)
10467
10171
2129
-》3.监控容器ID
3146
8685
10000
8588
315
-》4.监控数据库ID
7362
10101
-》5.监控网站或者协议端口ID
http监控某个网站
icmp监控某台机器
tcp监控某个端口
dns监控dns
9965
Nginx
9614
2949
5.查看监控数据
注意:prometheus 对时间一致性要求非常高,不然无法监控到服务数据。
【个人公众号】
【暴科技】、【非著名运维】 --》 公众号回复 “资料” 送运维自学资料大礼包哦!上面也会分享一些运维、科技知识,麻烦大家点点发财手关注一波,感谢大家。

